Tuesday, November 14, 2017
Saturday, May 16, 2015
My Destiny and yours...

My first reaction to the Babylock Destiny Machine was pure excitement but I convinced myself that I did not need it! I admit that I was a little irritated with myself for rushing to buy the Unity, even though I loved it. I was convinced that the Destiny was AMAZING but not needed, at least by me, no matter how cool it was!
Some facts you may not know about me:
a. I own a commercial embroidery business filled with Babylock Multineedles, A LOT OF THEM.
b. I have multi-needle Babylocks at home too!
c. I have limited 'selfish sewing time'
d. I own and use commercial digitizing software to include Floriani FTC-U, Palette 9 and Wilcom. I am a proficient digitizer, even though I tend to outsource the digitizing that comes into my shop as it is faster and more economically efficient. I do about 30% of digitizing jobs 'in-house'
You can see, why, I at first resisted the idea that I might need this machine. I waited, and waited some more before I even really contemplated it. It was after I saw the IQ Designer in a demo that I saw a need for this machine in my home! I was finding that I had developed a lackluster relationship with creating cute embroidery FOR MYSELF and family. I do this for a living so it is easy to become jaded with all the products available to us.
In a different blog I could tell you about the million reasons why I love and NEEDED this machine, but for now I will just tell you about one. The IQ Designer! What is the IQ Designer? Well for me it is a DIGITAL COLORING PAD that can take flat artwork, ANYTHING I choose, and make it into an embroidery design.
Here is what Babylock says it is:
Draw on screen, scan in, or import your own artwork and the Destiny will digitize it before your eyes. Using the IQ Designer, you can then edit your new embroidery designs down to the stitch. If you're finishing a quilt, use the auto-stippling feature to draw and choose exactly where your stippling will go
Today I will show you a tree I was able to create using the IQ Designer. I originally wanted an owl but changed my mind as I found that I could not locate a cute one that was in BLACK OUTLINE mode. I am sure you can use a pic like the one below, I just haven't gotten that far yet!
 |
| I guess I will need to figure out how to use color filled images |
Since I have limited 'playtime', I went with this tree, which I found online as FREE CLIP ART.
 |
| Use the provided magnets and clean artwork |
The thin small flat magnets work to hold the artwork in place while the item is scanned. You don't have to use all, just enough to hold it in place.
Next just choose IQ Designer on your HOME screen. Lights will dim and frame will move to scan the artwork. Be sure that area is clear so frame can move.
 |
| Lights automatically dim for cleanest scan |
Once the artwork has scanned it will show up on the screen of the machine, use the red arrows to CROP OUT the magnets and anything else you don't want to create stitches of.
 |
| Crop the scan using the red arrows |
Once art work is cropped you are on your way to creating your design, Using the edit screen you can add stitches to any closed area of the design, if there are open areas then you may want to use the PENCIL tool to close those areas. There is a LARGE BLACK ARROW at the lower portion of the screen, this is your UNDO. If you make a mistake just choose UNDO.
 |
| Ready to add some color to this design! |
Here is part of my design created.
 |
| Edit screen where you create your stitches |
And here it is ready to stitch, I added the lettering from the Alphabet Menu as the Destiny allows you to edit, change, create, re-place, combine or remove at your leisure.
 |
| Design with lettering added |
It would take a ridiculous amount of writing to give you every detail of the IQ Designer so I will give you a bit of advice. Well, two bits. The first- if you are considering a new machine and want one with all the bells and whistles...this is YOUR MACHINE.
The second bit of advice, if you manage to wrangle one of these beauties I encourage you to purchase the LOVE OF SEWING package that is available. It is a warranty of 4 years for your machine PLUS access to the hundreds of videos available to Babylock owners on ALL OF THEIR machines, to include the Destiny. You can watch the videos from the comfort of your own home, any time day/night.
The second bit of advice, if you manage to wrangle one of these beauties I encourage you to purchase the LOVE OF SEWING package that is available. It is a warranty of 4 years for your machine PLUS access to the hundreds of videos available to Babylock owners on ALL OF THEIR machines, to include the Destiny. You can watch the videos from the comfort of your own home, any time day/night.
There is a wealth of knowledge in there and I myself have thoroughly enjoyed using it. I am not really a manual type of girl, I like to watch a video and learn that way. If you prefer DOCUMENTS then there are PDF's for every class, class notes that you can print to refer to. It is a really neat program. The link is below if you would like to check it out.
Here is a photo so far of the tree being stitched out, don't forget that this began as a flat piece of clip art and I used only the machine to create the stitching. Well, that makes it sound like I did something other than point and click...he he he.
 |
| Design while it is stitching out |
This is truly an amazing feature. For me to not have to spend large quantities of time digitizing something fun for my mom, it is just really exciting to see how far these machines have come over the last decade! The lesson I learned was to use fairly clean LINE ART, broken lines will need to be re-drawn.
I am also considering using adult coloring pages like this sample below. Wouldn't that be fun? With the machine doing all the 'creative' work I see in my future a lot of time to play and enjoy embroidering again!
 |
| Page from an adult coloring book |
It is also possible to add stippling automatically around any design you choose, which is what I did here. I only wanted stippling around my tree.
 |
| Scanned the finished embroidery and added the stippling |
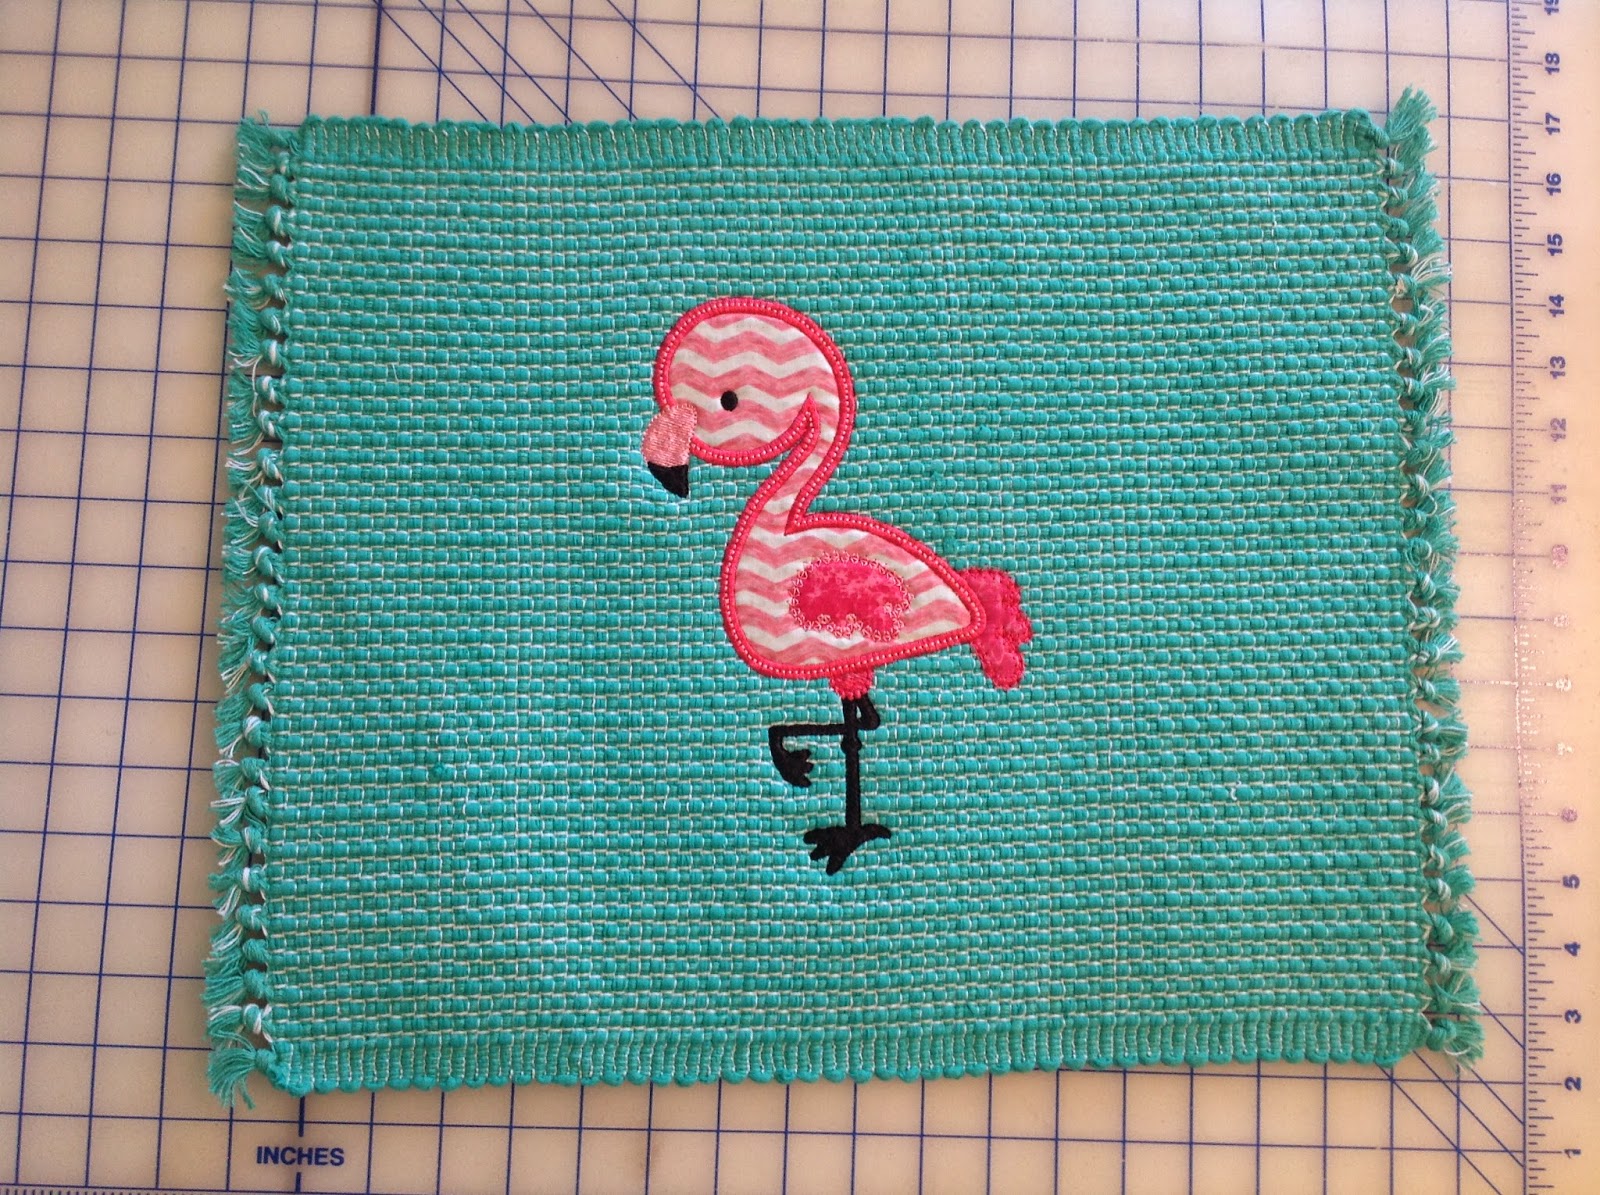
Here is the completed project, it will be a small pillow for my mom's house, they are moving from Tennessee back to Texas to be with some elderly siblings and I want her to remember that while I loved having her and dad so close, it is now time for them to be near his sisters. All seasons of life are SPECIAL!
 |
| With the stippling added |
Head on over to your nearest Babylock retailer to fulfill your DESTINY!
Saturday, April 5, 2014
Embroidering on Textured Fabrics
 |
| Working with textured fabrics is simple once you know a few tricks. |
Embroidering on Textured Fabrics
Once of the best things about an embroidery machine is that you can literally put any design on any thing, right? I wish there was an easy quick one sided answer for this but there really isn't. Most professional embroidery designs are 'digitized to fiber' meaning that the digitizer is aware of the fabric type that the embroidery file will be stitched onto and the digitizer will plan the stitches accordingly.
With the mass production of embroidery designs that are for sale it is not always easy to find a specialized design that will work well on raised textures. Most designs are digitized to a 'woven standard', meaning the design will stitch very well on most woven fibers. The same design can be stitched on a knit fiber with some prep work (fusible poly mesh stabilizer). But what about designs that you LOVE that weren't necessarily digitized for the fabric you want to use?
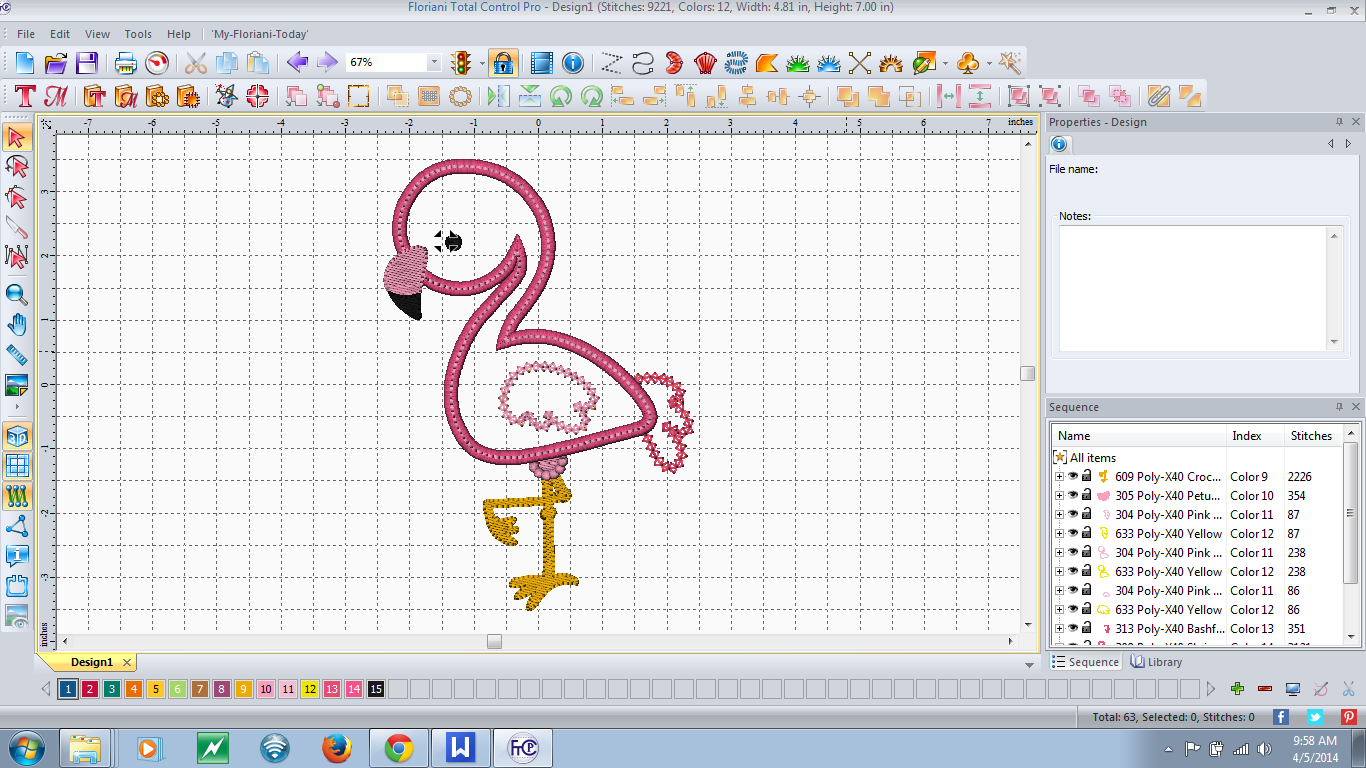
Let's take this cute flamingo applique design for example. It is 7 inches wide and 4 inches tall and has a mix of satin, fill and decorative stitching. It is cute and most likely will work well on a woven or knit fiber but what about on a textured place mat or a towel? The very nature of napped and raised texture fabrics makes it difficult to choose just any old design to embroider with, this particular flamingo has delicate legs and the wing formation is a run stitch. All very nice but not necessarily for a napped fabric.
Using my software I measured the satin stitch width which is about 1/4 of an inch, that is pretty narrow and may cause difficulties on the wrong fiber. If you do not have software to that can help measure and change stitch types you may want to consider purchasing some, I am using Floriani Total Control.
 |
| Narrow satin stitches make this a poor candidate for embroidering on terry cloth or raised fabrics. |
There are a few things that can be done to help this design achieve it's full potential and give us the ability to embroider this design on much more than a t-shirt. The first thing we need to do is adjust the pull/push compensation to 110%, this is a fancy way of saying we increased the satin stitch width, we need the satin width to be a little wider due to the fact that some of the width will 'fall into' the texture of the fabric.
I know that you have been taught that this is what water soluble stabilizer is for and yes, water solubles are good, but by themselves they cannot fix the problem of falling stitches because eventually they wash away and the fiber stands back up. An alternative is a heat-n-gone but you need a fairly hot iron to remove this stabilizer and that isn't always a choice for some fabrics so let's fix the root of the problem, not mask it.
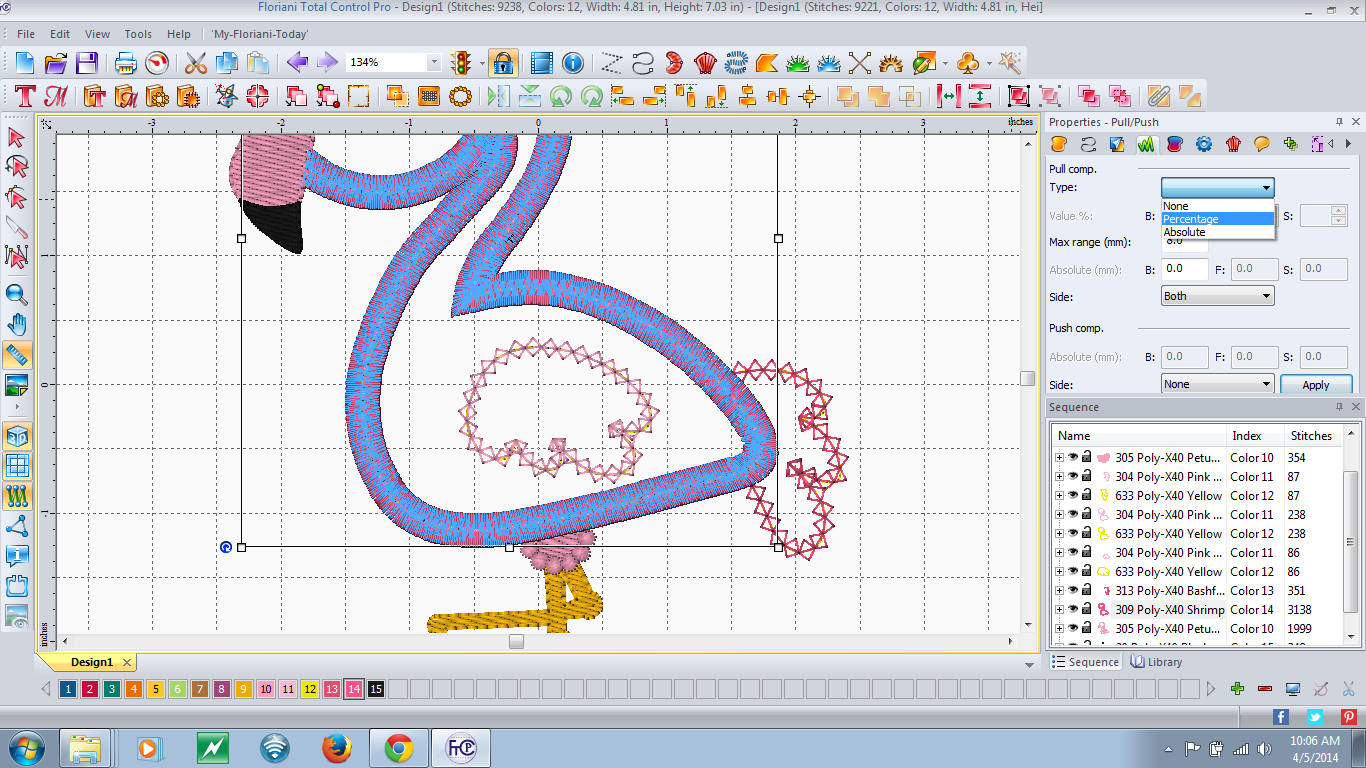 |
| Here is the satin stitch high-lighted in the Floriani Total Control Software, we increased the pull/push to 110% and this increased the satin width to .28 as opposed to .25 originally. This extra width will help keep the satin stitch from falling into the raised fiber. |
Increasing the satin width needs to be carefully done, a satin width wider than a half inch will not stitch well on most home embroidery machines and has a tendency to snag and pull, so please try to increase it a bit without going overboard. I also want to take a minute to say that we increased this design to fit our needs, it doesn't mean the design was poorly made, just that it wasn't digitized for our needs.
Viewing the other components of the design I have determined that they will stitch just fine on my textile which is a bumpy sort of place mat from Target, it has a raised woven texture which gives it lots of character but makes this prep work necessary for good quality embroidery.
Here is a picture of the place mats. See the texture and raised bumpy feeling of this textile? These place mats are great for summer and will look even better with our flamingo design but you can see why we had to prepare the file, a normal embroidery or applique file would just sink down into this place mat and really not look as rich and full as good quality embroidery should.
 |
| See the depth and texture? This is what makes this fabric so much fun but also requires us to prepare it for the embroidery process. |
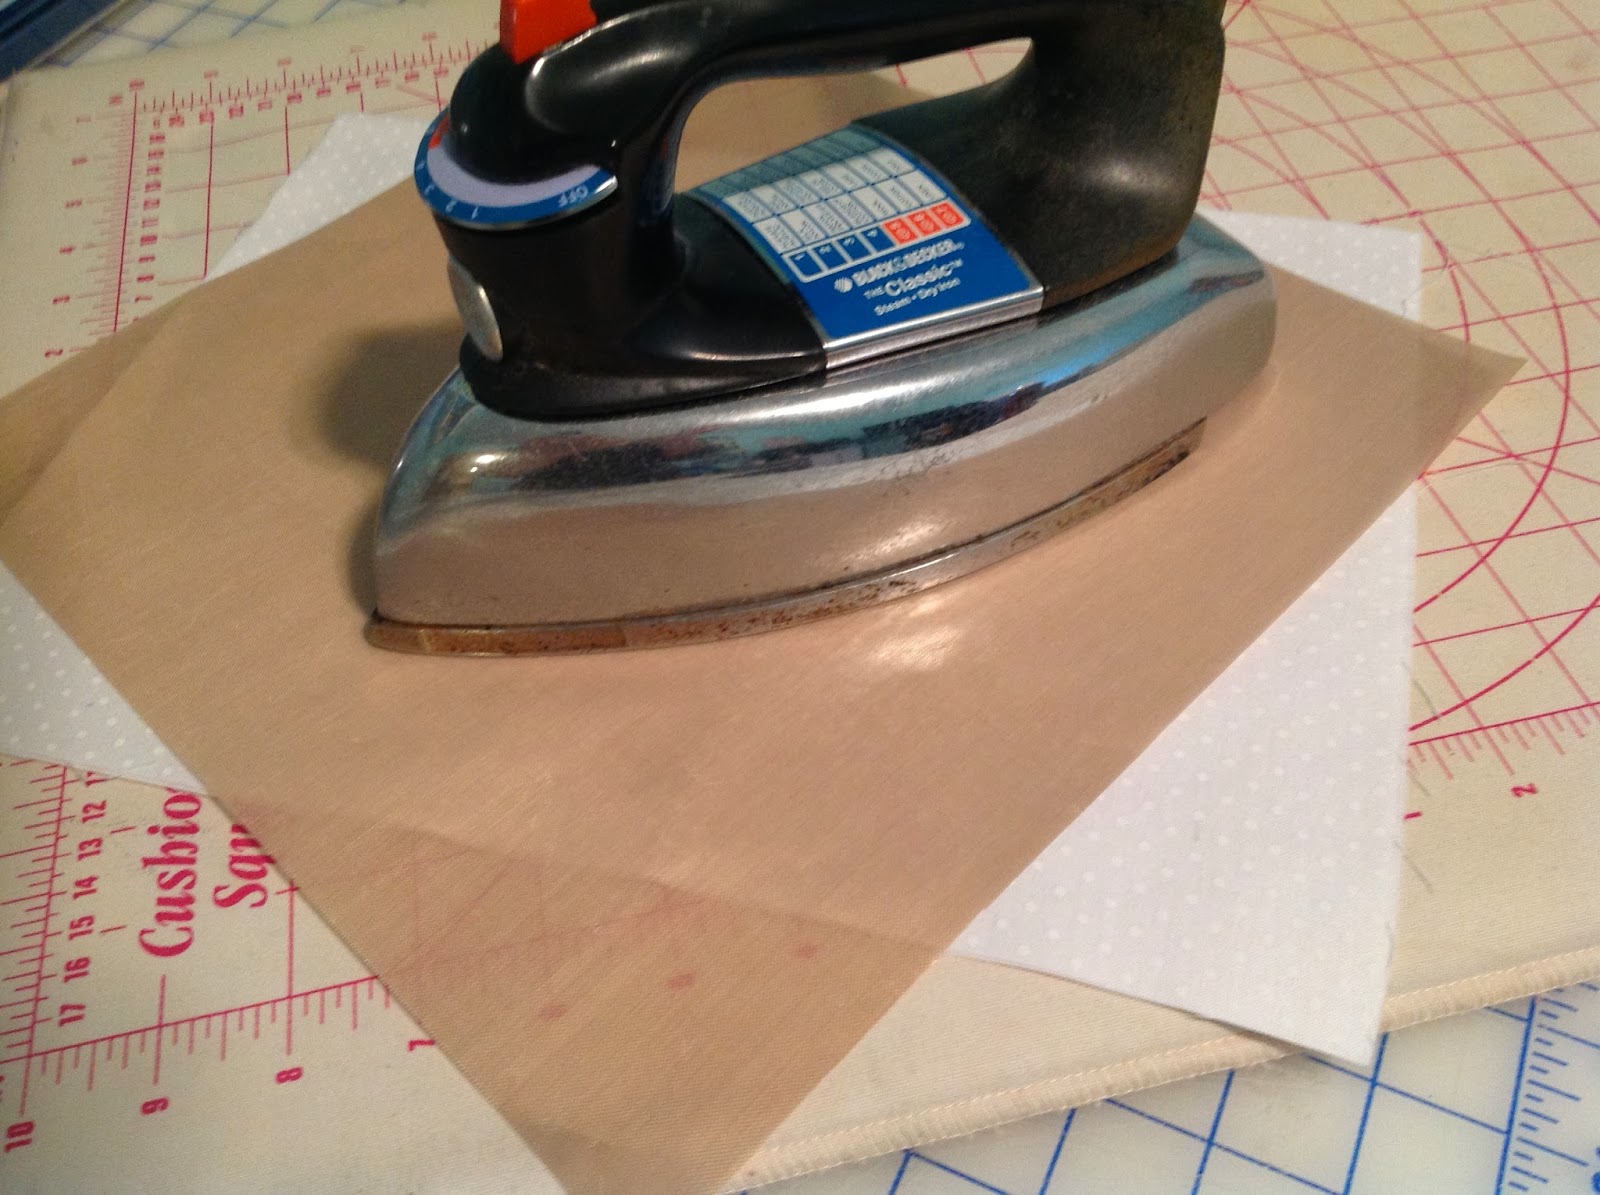
The design has been prepared and now it is time to pull out our secret embroidery weapon and you won't find this in your local embroidery shop...this product you probably have in your kitchen. The product I am referring to is Glad Press-n-Seal.
 |
| Used as a permanent topper this clear product works great to 'hold down' raised fibers and make them behave during and after the embroidery process. When used with the proper needle type and prepared embroidery files Glad Press-n-Seal will make your life so much easier. |
You will need to hoop your item and use the proper 'back side stabilizer' as usual. What I mean is that my item is a woven place mat so I will be using a tear away stabilizer in the hoop and the Glad Press-n-Seal on top of my place mat. One of the things I love about this product is that it uses static electricity to 'cling' to pretty much anything, it doesn't need to be basted or pinned into place, it just sticks where you want it to.
 |
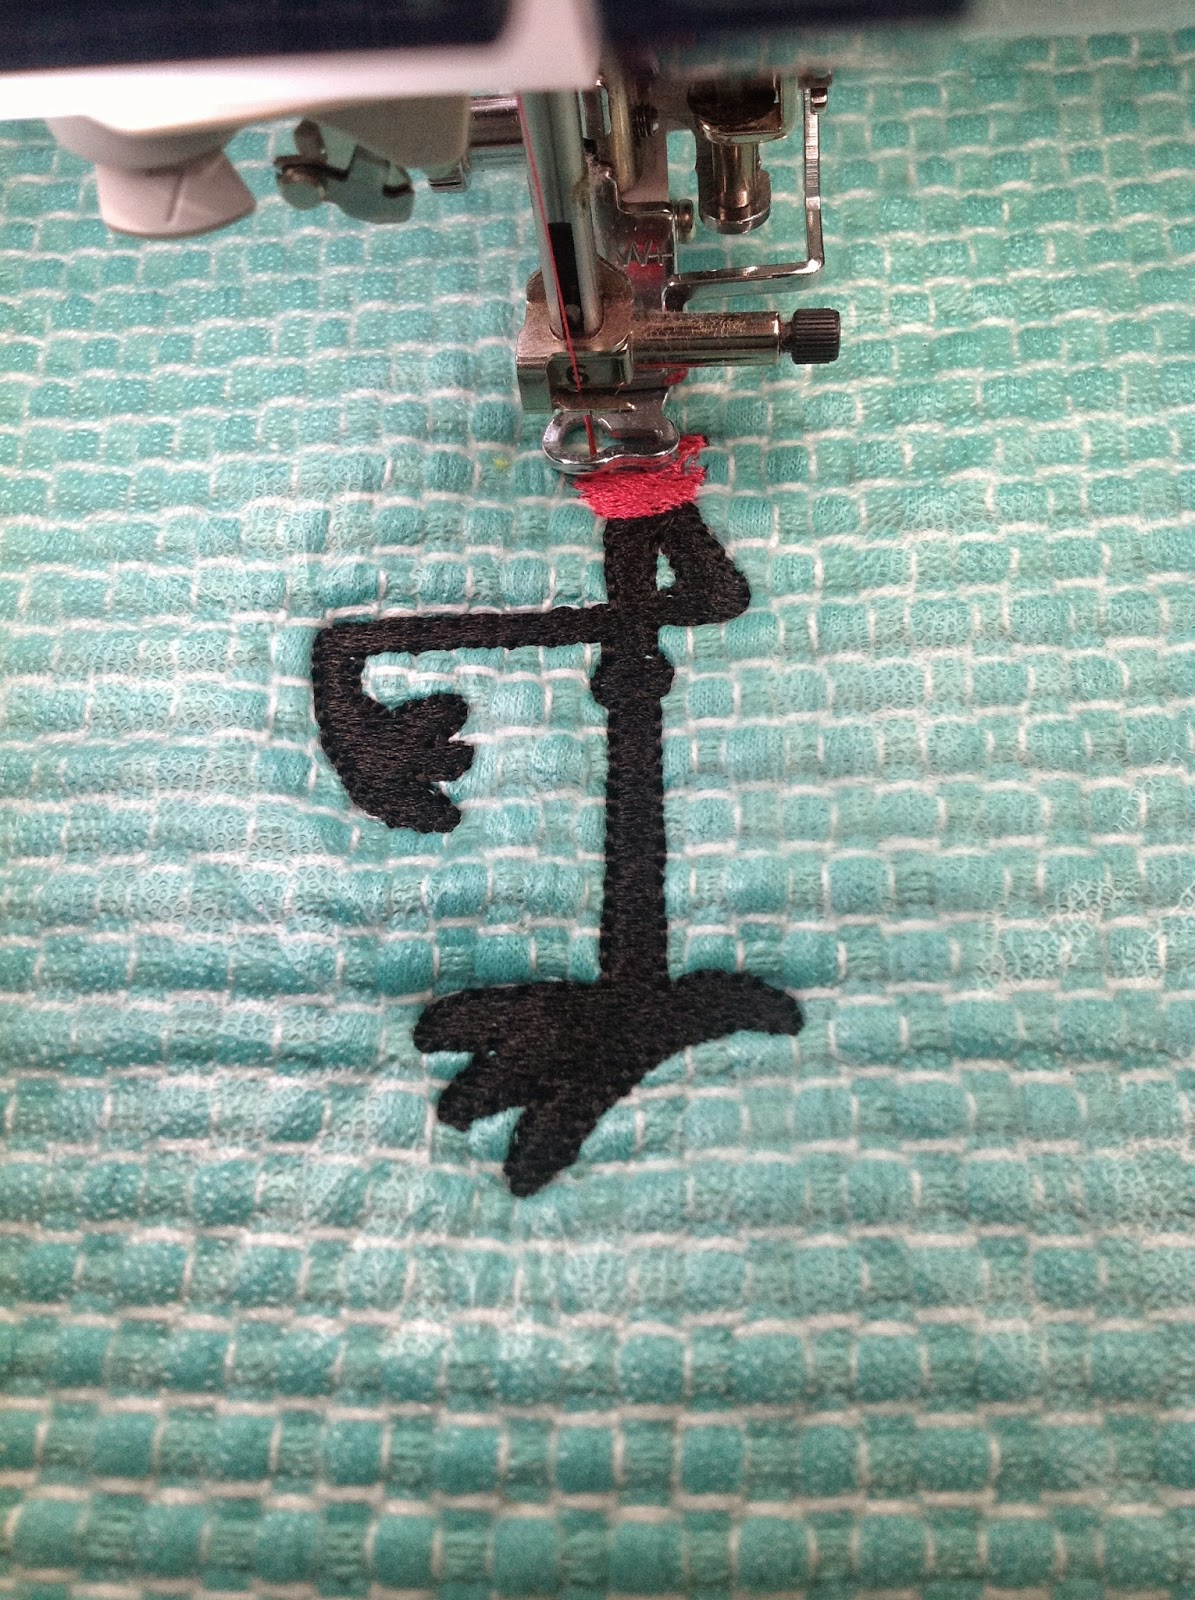
| Here is the place mat with tear away stabilizer in the hoop and the press-n-seal on just stuck to the top, the press-n-seal will keep the stitches from burrowing down into the raised texture of the place mat and it would be a good idea to use a 90/14 Schmetz Embroidery needle, that is a little bigger than the traditional 75/11 but this nubby fabric is quite thick and we want to be sure to perforate the press-n-seal for easy tearing when we remove the excess. |
Here is a shot of the press-n-seal in action, notice that the leg part of the design looks clean, none of the stitches have fallen into the texture?
 |
| Fill and Satin stitching on raised textiles is vastly improved with Glad Press-n-Seal. |
If you are one to use a fusible with your applique you will want to take an extra step here and remove the press-n-seal from the portion of the design where the fusible fabrics will be placed...if not when you go to fuse your fabrics in place you will melt the press-n-seal.
 |
| Portion of the area with the press-n-seal removed, we only removed it from inside the area, not outside, we still need the press-n-seal in place for the final satin stitching, and you need only remove it if you are using a fusible applique fabric, if you are using a plain fabric it can be left in place. |
There are some obvious questions that arise when learning a new technique or trick and these are what I believe will be the most asked.
- Can I use this technique with any fabric? Yes, but it really isn't necessary for non-napped fabrics.
- Do I need to consider my design when using this technique? Yes, you need to make sure that you have a fill or a satin stitch as part of your design, using press-n-seal with run stitched designs just doesn't work, you need enough needle penetrations to perforate the press-n-seal.
- Do I have to increase the push/pull compensation? You don't have to but if you have the software to improve stitch quality why in the world would you not want to?
- How can I be sure the press-n-seal will tear away cleanly? If you have a fill or strong satin stitch which most designs have then the press-n-seal will tear away cleanly, if you have a design with very narrow satin or run stitches the press-n-seal may become caught.
- Is the item 'washable' with the press-n-seal- permanently in there? Yes, you may wash your item as you normally would, please no extra high heat in the dryer. I have used this for years without any difficulties.
- Won't this stuff gum up my needle and my machine? Nope, that's the great thing about Glad Press-n-Seal. It is 'statically charged', that is what makes it cling to your fabric, it has no gum or glue in it which makes if safe for food and embroidery!
 |
| Notice we removed the press-n-seal from around the wing, we did this because the stitch around the wing is a patterned run stitch, not a satin or fill stitch and it would have been difficult to remove the press-n-seal once that final run stitch was in place. |
At just $4 for 140 square feet- Glad Press-n-Seal is a real embroidery bargain!
 |
| P.S. Just because we said you can use some kitchen products for embroidery please don't use coffee filters in place of tear away stabilizer. |
You might be wondering...who am I to tell you to try some un-orthodox method on your expensive embroidery machine, and you are wise if you use discernment when choosing which products to use with your machine. For those of my readers who don't know me I have a Master's Degree in Raised Textile Design and I have been doing machine embroidery since I was about 4 years old. I was raised in the embroidery and textile industry under careful tutelage of my grandmother and I own a successful machine embroidery design shop.
Always, always use good judgement when using 'alternative' products with your machine, the technique we showcased above has been tested on 11 different types of machines to include smaller home embroidery machines all the way up to commercial machines.
The Press-n-Seal has no glue or tackiness added to it, it simply uses the process of static charging to give it that unique 'cling' factor. It is not a woven material and it isn't paper so there is no risk to your machine parts, it should be used as directed above.
If you try it and like it please let us know.
Nicci Brazzell
MaEd, M.F.A
Wednesday, February 12, 2014
Loading and Cutting the Heat Transfer Vinyl Part 2
 |
| Remember I said to load the vinyl face down? With the matte side facing you? And some of you are like me and jumped ahead and didn't do it the right way...that's okay..if you have shapes in your design they can still be scrapped off the mat and fused to your garment, if you had words they can't be used because the will be in reverse when pressed. |
 |
| Here is what it looks like when you have the vinyl with the glitter side up...it looks a mess and it is but you can salvage some of the pieces if you like. |
Here is the video of the machine being loaded. The entire sheet of the glitter vinyl and the 'clear carrier sheet' are removed from the mat. Then you begin to 'pull away' the excess vinyl, leaving just your design. Be sure to remove all of the excess so your design will look clean. Yes I could have edited the video so it would look like the excess pulls away in one fell swoop but it doesn't and you know me...I am all about the real deal. When picking out the excess pieces it is called 'weeding'...hmm, wonder why...maybe it is because it is like real weeding and it is irritating. Irritating, but the effect achieved by the glitter is worth it.
 |
| Check that your heat transfer vinyl has this clear 'backing' called a carrier sheet, if it doesn't you will need to purchase some carrier tape to help you line up your designs. |
Here is the video of how easy it is to remove the excess vinyl.
I want to make sure that you are aware that it won't look as though the vinyl has been cut, you will barely see the cut lines and this may lead you to believe that you need to re-cut..DON'T DO IT. The machine has cut the vinyl exactly as necessary and you don't want a deep cut because the carrier needs to stay in place so you can place the item on your garment and press it in place. The sticky clear background is called a 'carrier' and no I don't know why, guess because it carries your design to your garment!
Once the excess is removed heat up your heat press or iron according to manufactures settings for the type of vinyl you are using.
 |
| The clear 'carrier' will stay on during the pressing process, it won't stick to your garment but you will need to use the pressing sheet provided by Siser or use and Applique Pressing Sheet like the one pictured. |
 |
| Press for the recommended time. |
 |
| Carefully lift and remove the carrier and your item is ready. |
Now for the good stuff that no one seems to want to tell us newbies...here are the MACHINE SETTINGS FOR Heat Transfer Vinyl when using the Brother Scan-n-Cut
Use the Aqua Blade set to number 2
Set the Machine Cut Pressure to 1
Set the Cut Speed to 1
Use the Standard Mat
Place Glitter Vinyl Face Down
These setting will work with the heavier heat transfer vinyl that has a clear carrier, I do not yet know what the cut settings are for other types of vinyl because I haven't used any yet but as soon as I know I will post it here on the blog.
Now go have fun with your cutter and quit being intimidated by it, it really is that easy!
Nicci Brazzell
MaEd, M.F.A
Using Heat Transfer Vinyl With Your Brother Scan-N-Cut Part 1
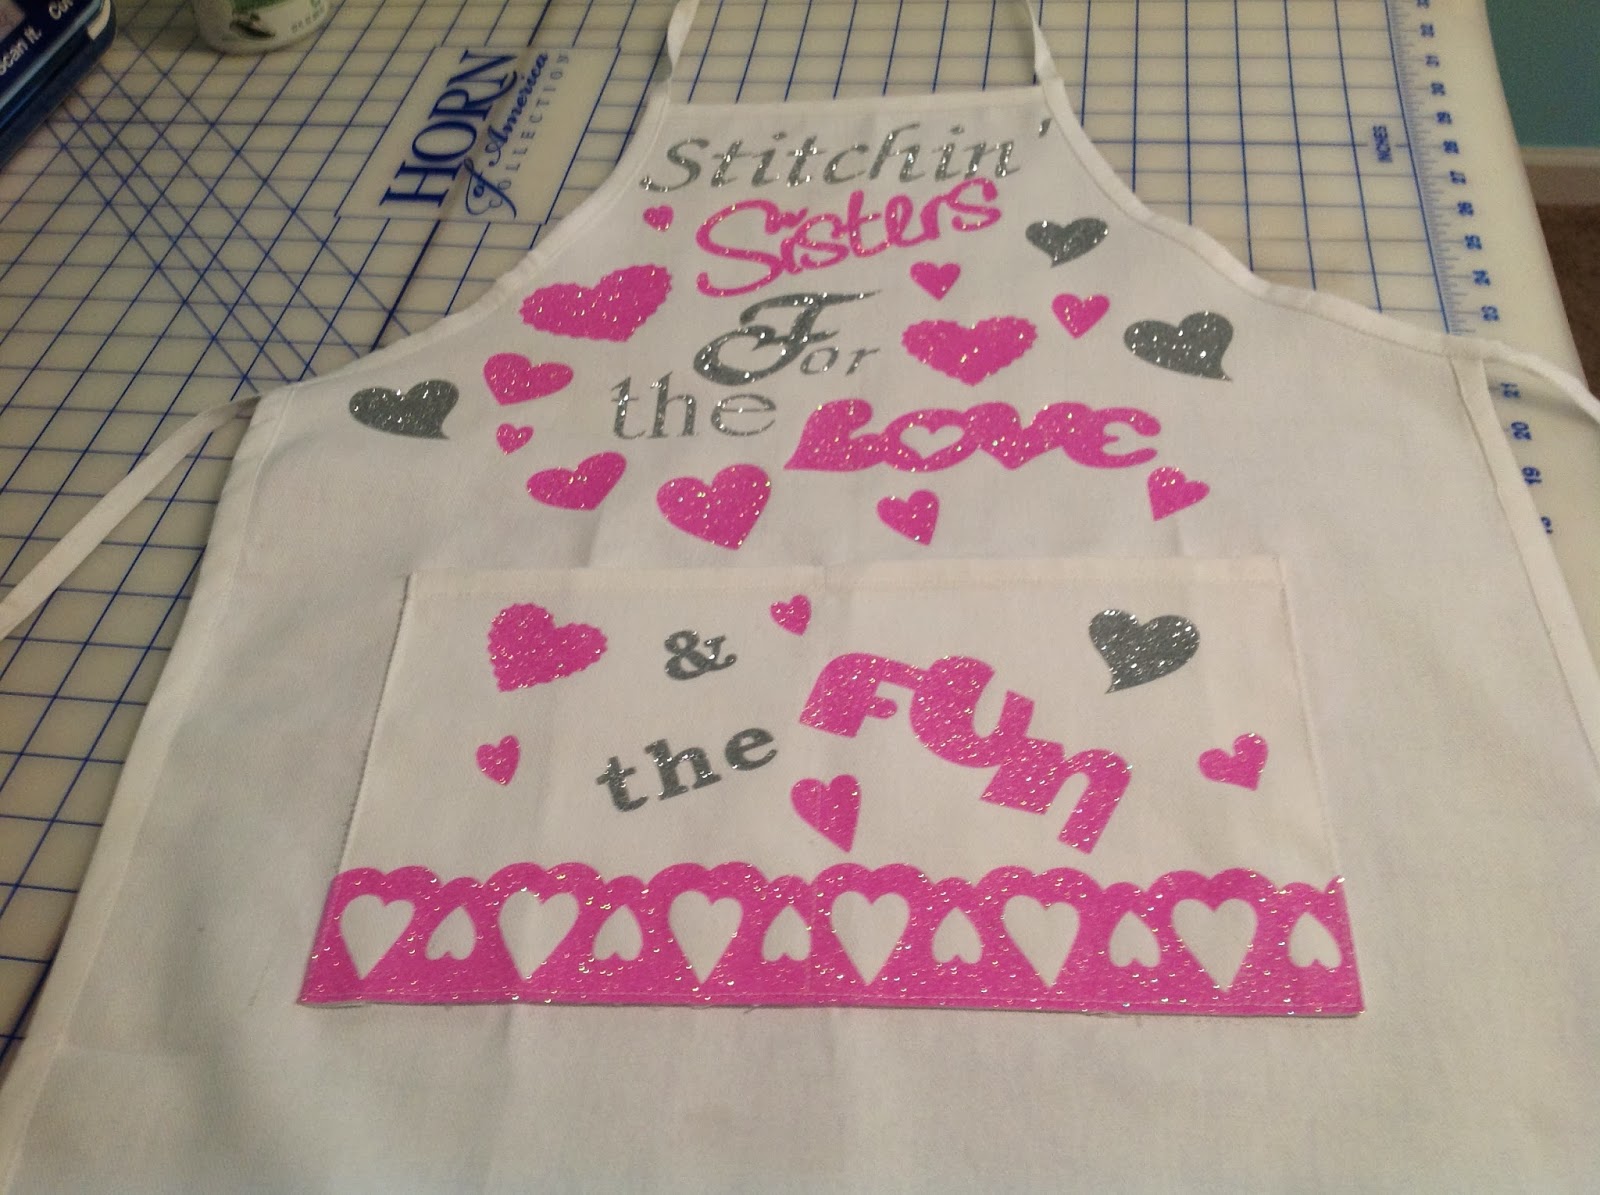 |
| I used heat transfer vinyl to create this apron for the Stitchin' Sisters event our dealership is hosting. |
For those of you who know me you know that I am in no way a vinyl or screen print master. I am a raised textile artist by trade and it is my first love. I did however recently purchase a Brother Scan and Cut and I have really enjoyed cutting out fabric and making appliques with this wonderful tool. What surprised me the fact that I was interested in using vinyl as well (for those times when you don't have the energy or where with all to embroider an item for one time wear).
The first thing I learned while attempting to order some vinyl was how many different types there are! There are outdoor vinyls, indoor vinyls, heat transfer vinyls, glittery vinyls, flocked vinyl, printed vinyl, vinyl that has transfer tape adhered to it and vinyl that requires YOU to add the transfer tape (yeah- that was a fun day).
I found that I prefer the type of heat transfer vinyl that has the transfer tape already applied. It seems this type is a little more expensive but the ease of use is worth it to me. I ordered mine from Siser and it was called 'easy weed' which means it was easy to remove the 'left-over' parts. I have friends who use vinyl cutters but I am a newbie at this so I just went with it.
 |
| This is what the glitter heat transfer vinyl looks like. |
Once the vinyl arrived at my house I was a little surprised to feel how thick it was, IT WAS THICK and I wasn't sure that the cutter blades would cut it. I want to mention that I myself didn't find the book that came with my cutter to be very handy. At first this irritated me and then I realized that there are literally hundreds of materials that you can cut with this machine and there just was not a way for them to impart that into one tiny little black and white booklet.
So I did what I always do...jumped right in and messed up some vinyl. Now some people get stressed when they ruin a project but I don't because I count my failures as learning lessons-hard won and not cheap but learning lessons none-the-less.
The first thing I learned is that if you want to cut heat transfer vinyl you have to reverse the letters...always reverse the letters.
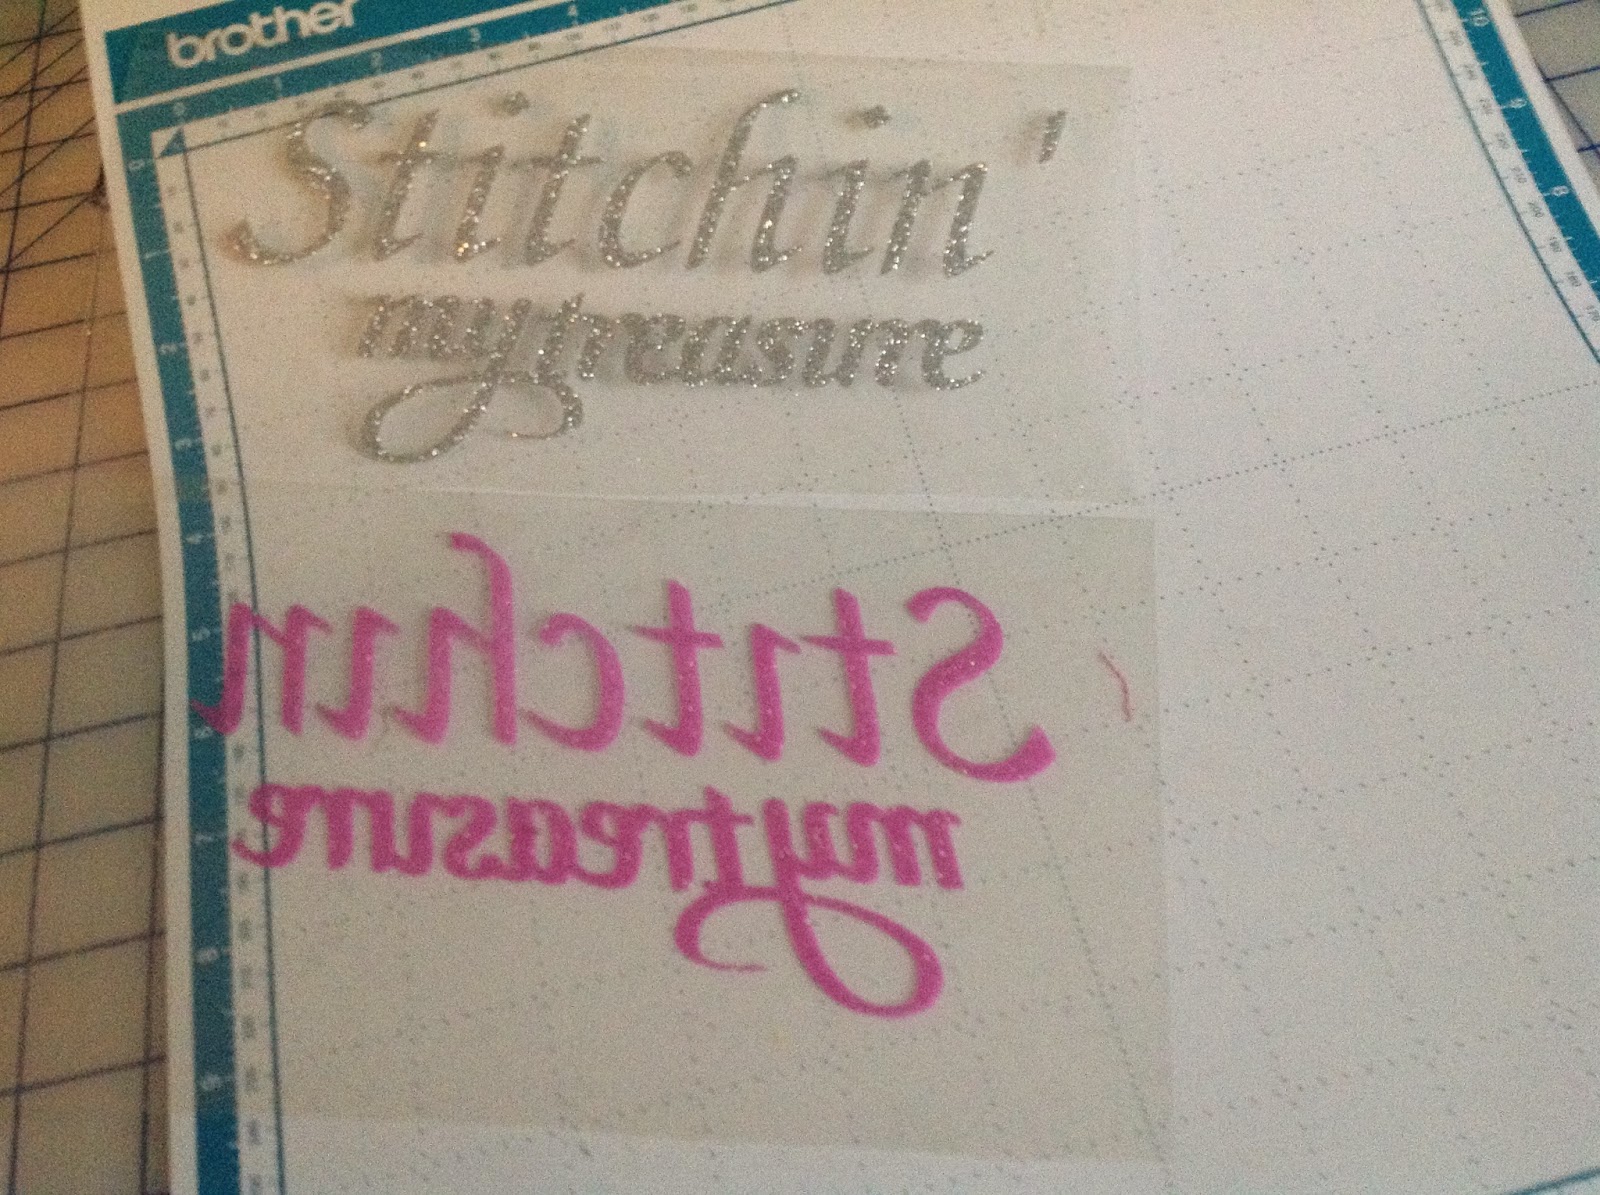 |
| See the pink one? It's backwards because I forgot to reverse it. |
To create the apron we needed to use the machine lettering and designs or use the Cloud Based Software Brother Scan Cut Canvas, you just sign up and you can use the software to create anything you like. What we created could also be created right at the screen on the Brother Scan and Cut machine.
Once the software is open you can see that the screen looks a lot like the mats that came with your machine and you can move things around to create the type of cut files you would like.
 |
| This cloud based software is easy to use and even has a PDF that you can open and download if you are into that type of thing... |
Once I had all the hearts, words and designs that I wanted to cut I used the download button and a thumb drive to save the design.
 |
| Click on the Download Button |
 |
| A little window will pop up asking you to 'right-click' on the file name that is underlined, just like in the picture. |
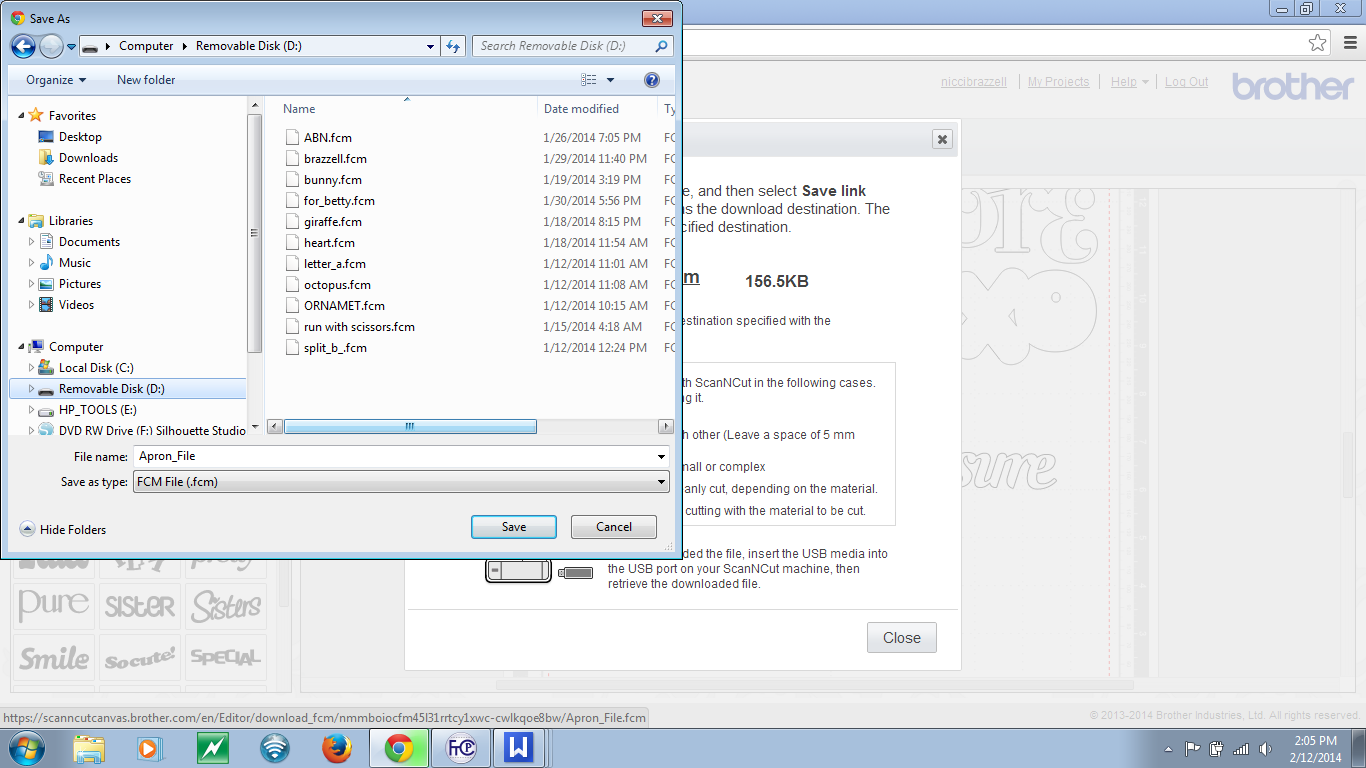 |
| Once you 'right-click' the computers browser will open and you will need to locate your thumb drive and save the file there. You can follow the directions on the screen from there but basically the design is now on the USB stick and you can insert it into your machine and load your design to be cut. It really is that simple. Now remember I mentioned that if you have lettering you need to reverse it? Well you need to do that at the machine, basically click on any areas of the design that are lettering and mirror image them. (The instructions on how to do this are in the manual that came with your machine). From here on out we are going to do this in a step by step fashion. Step 1. Load the mat (just kidding). Using the standard mat cut a piece of the vinyl a bit larger than the size the design you created. When placing the vinyl onto the mat place it SHINY side down, trust me...the GLITTER SIDE GOES FACE DOWN. It doesn't make any sense to me either but the vinyl God's have deemed it so. |
Subscribe to:
Posts (Atom)